Integrating QuickBooks with NeedleNine is a simple process.. Follow these steps to unlock enormous functionality and savings for your operation. If you have not already subscribed to QuickBooks, do that now before continuing setup.
Note: QuickBooks Simple Start is the minimum supported version. However, you may consider upgrading to Plus if you want to save significant time managing inventory and use advanced reporting.
Connect NeedleNine to QuickBooks Online
1. Log into NeedleNine using the same account as QBO administrator. Failing to use administrator account will inhibit QB connection.
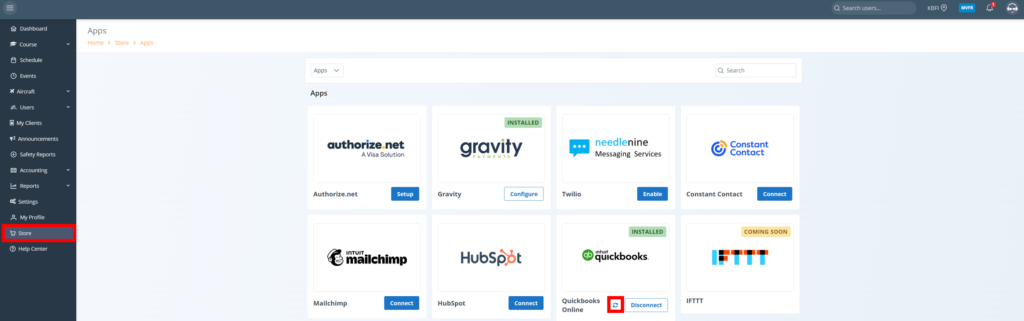
2. On left nav menu, click Store.
3. Click Connect on QB tile.
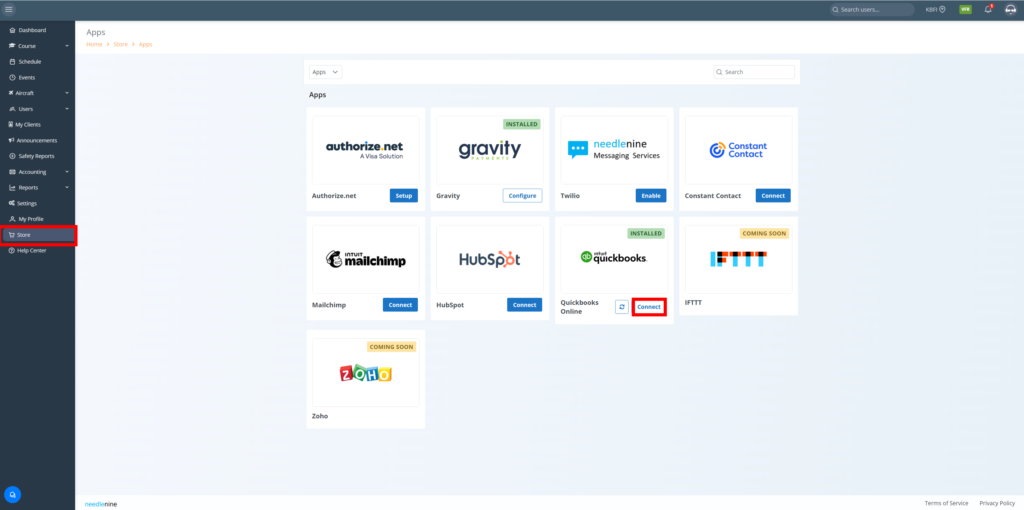
4. An Intuit login window will appear. Log in using administrator account.
5. Once logged in the connection will begin syncing information for the remaining setup process. Depending on the amount of data, this may take several minutes to complete.

6. Once done, you will see QB tile indicating successful connection has been established.
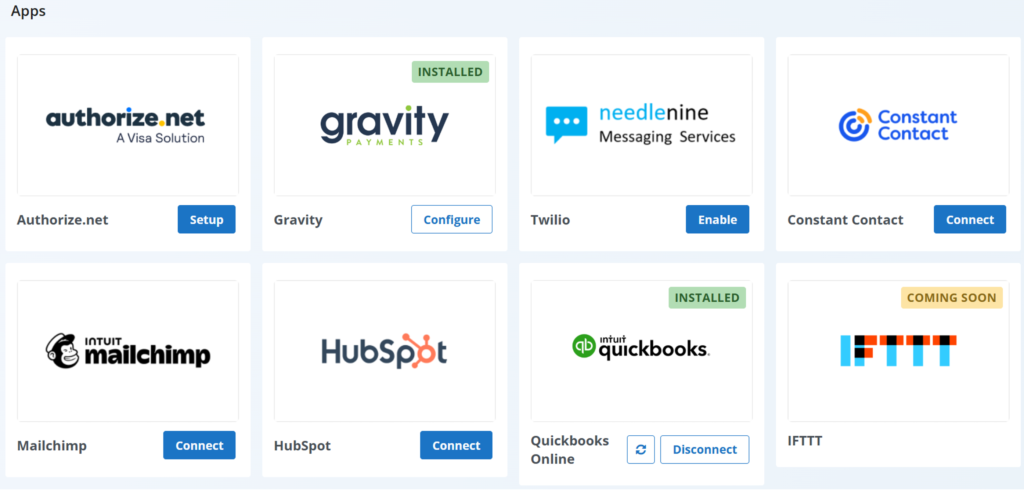
WARNING: Disconnecting QuickBooks in NeedleNine once connection is established may result in lost data. Contact Us before disconnecting so we can assist in resolving any issues you are experiencing.
Configure QuickBooks Settings
Follow these steps to configure/validate QuickBooks settings for proper NeedleNine integration. Failure to properly configure will result in sync errors.
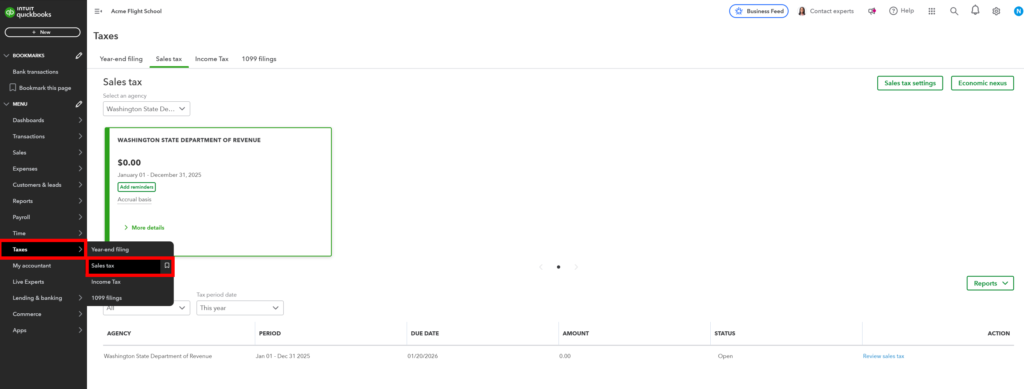
Set Up Sales Tax
1.On QB left nav menu, click Taxes and Sales Tax option.
2.If no Sales Tax Agency exists, create at least one agency to ensure proper item mapping. NeedleNine will automatically calculate and apply tax for each location.
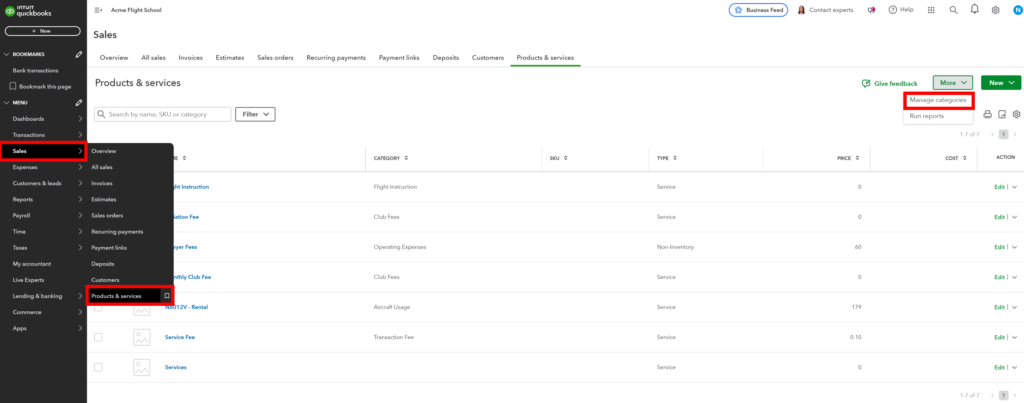
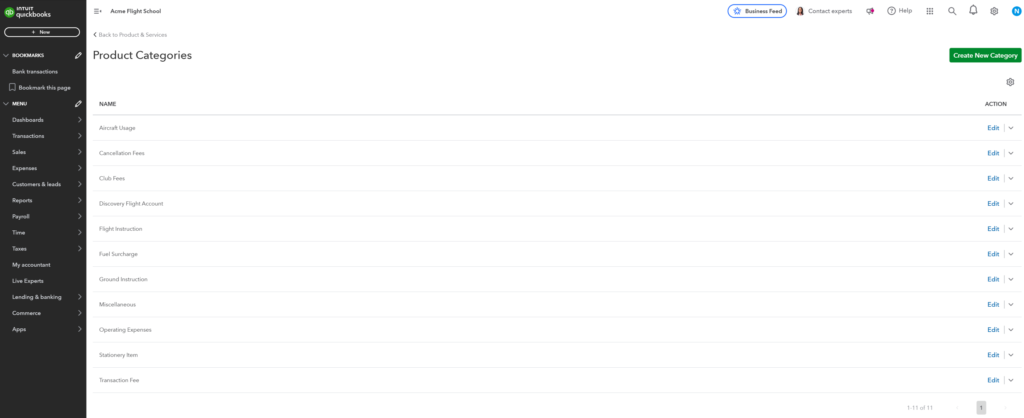
Track Categories
1.On QuickBooks left nav menu, click Sales and Products & Services.
2.On right side of screen, click More button and Manage Categories to view existing categories.
3.If no categories exist, create one Sample category to initiate category syncing with NeedleNine. All parent categories from NeedleNine will sync with QuickBooks to simplify custom reporting.
Configure Instructor Payroll
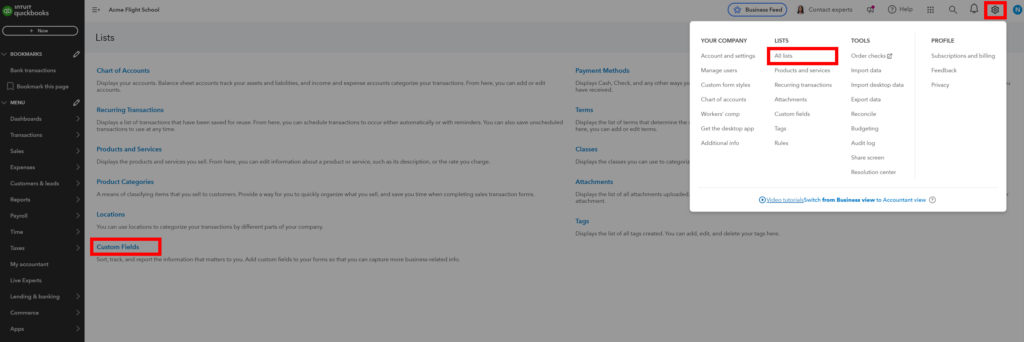
1.On QuickBooks main page, click the gear icon on top right corner and choose All Lists from menu.
2.Choose Custom Fields option on page.
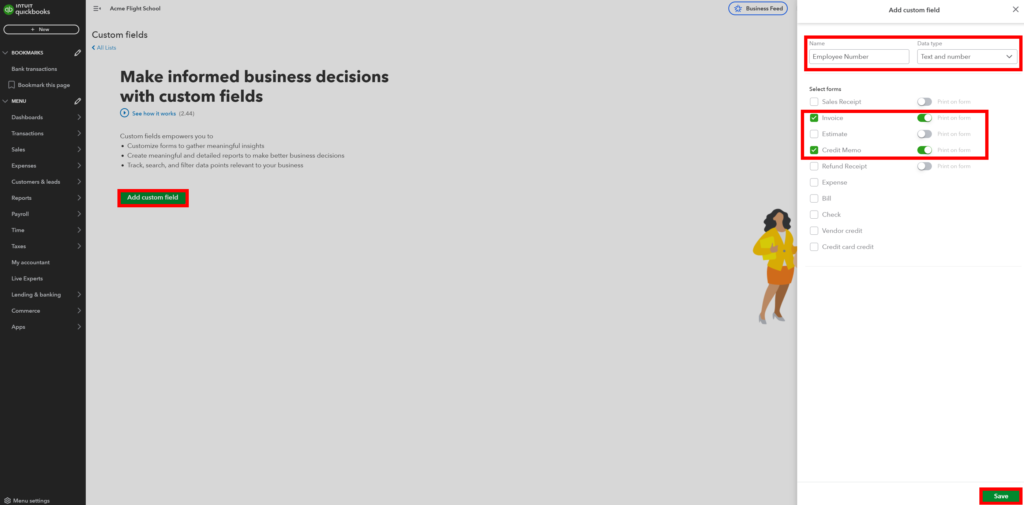
3. Click Add Custom Field button to open modal.
4. Enter label in Name field such as Crew # or Employee Number.
5. Select Text and Number from Data Type dropdown.
6. Check Invoice and Credit Memo for select forms and sliders if you wish to also display who performed instruction on invoices generated by QB.
7. Click Save button to record settings.
Syncing Existing Items
Note: If you are migrating from another service provider, these steps will differ. Please contact NN Support for assistance to complete QB setup process.
If you have an existing QuickBooks company file, follow these steps to import selected clients and items to avoid duplication.
Import Users
1.On the NeedleNine left nav menu, click Store and the Sync on QuickBooks tile.
Note: After initial setup, syncing again will update the existing NN items using the same QB ID’s. However, we recommend only using this feature for initial setup to avoid possible data issues.
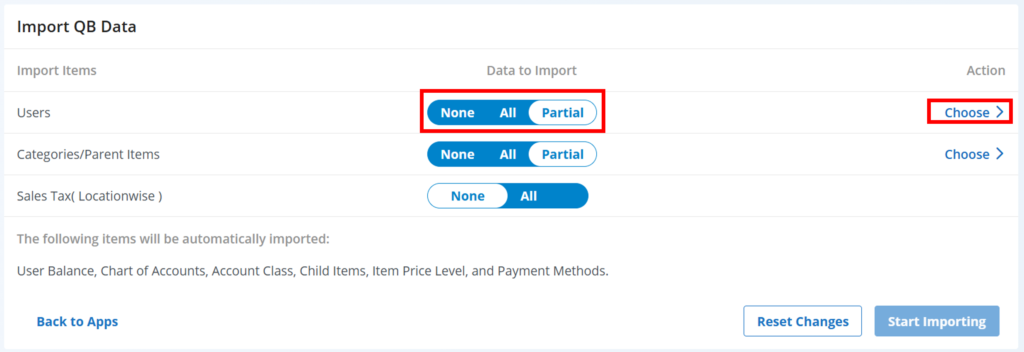
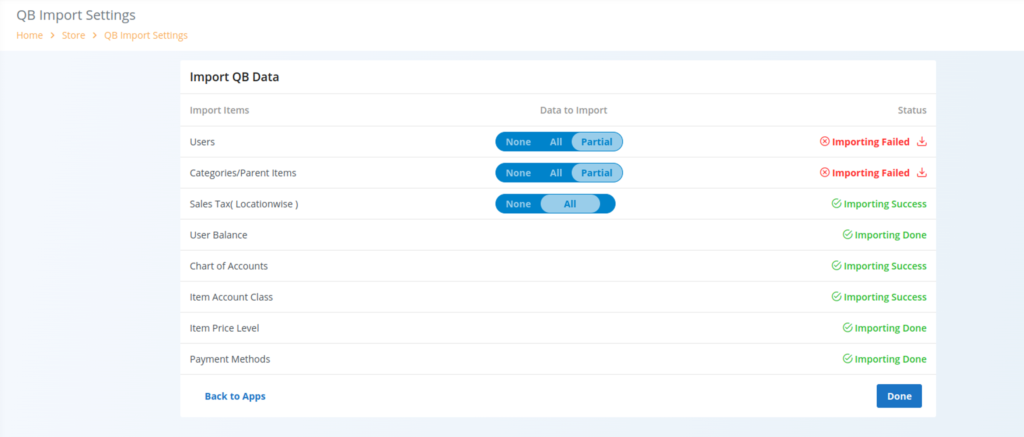
2.You may import existing user accounts from QuickBooks to NeedleNine. Select None, All or Partial as appropriate.
3.If you want to select specific account to import, choose Partial and Choose link on right side.
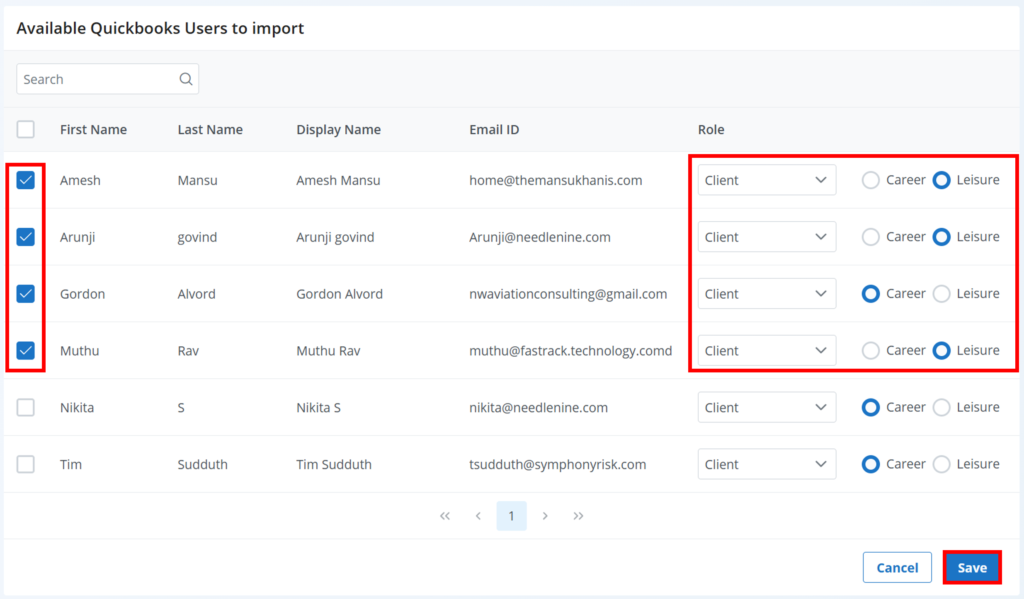
4.Select the individual users you wish to import. This will map accounts between two systems.
5.Select appropriate role for user and training category.
6.When done, click Save.
Note: Additional accounts or items created in QuickBooks will not automatically sync with NeedleNine by design. Only items and accounts created in NeedleNine will sync to QuickBooks.
Import Categories
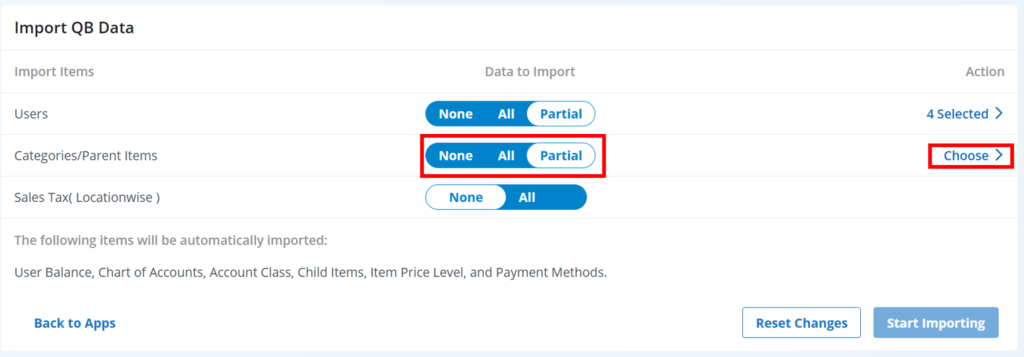
1.You may import existing categories you are using in QuickBooks to NeedleNine. Select None, All or Partial as appropriate.
2.If you want to select specific categories to import, choose Partial and Choose link on right side.
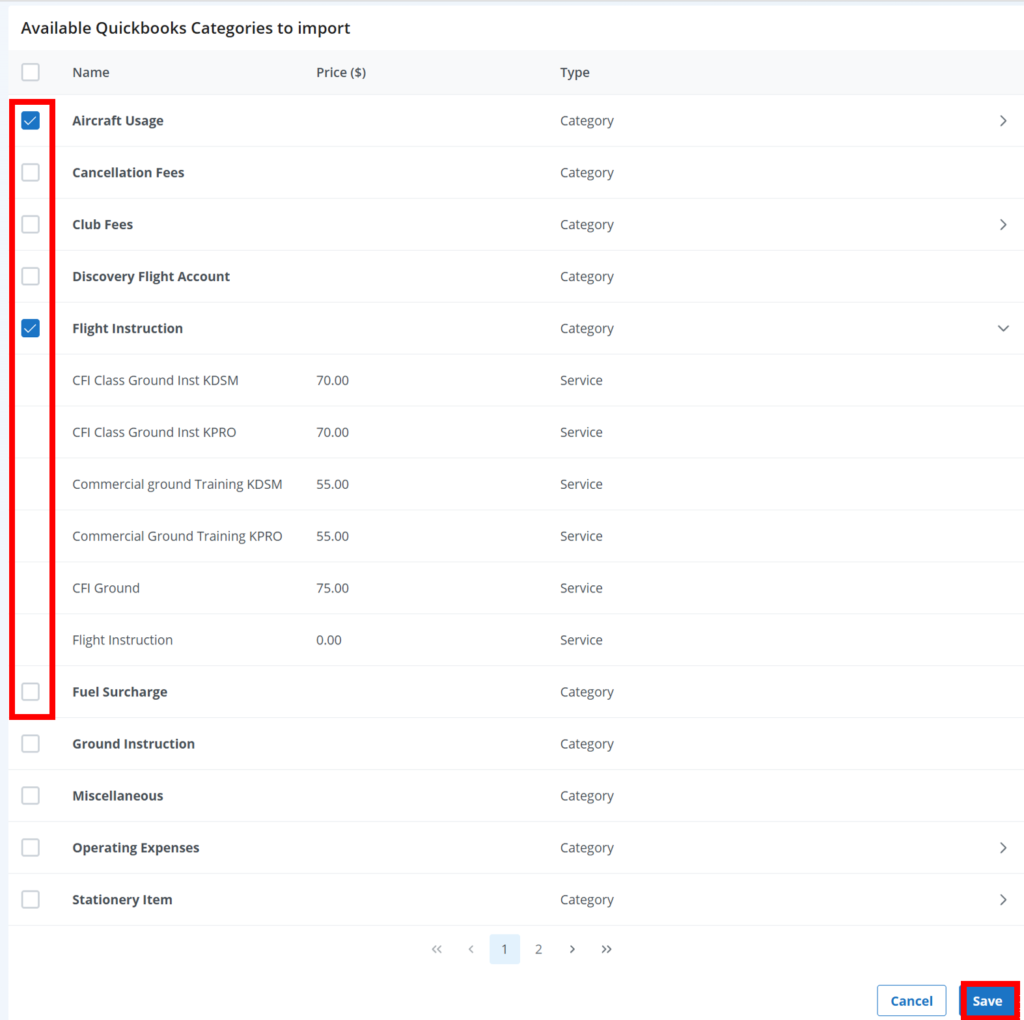
3.Select the categories you wish to import and establish sync connection.
4.When done, click Save.
Note: Additional accounts or items created in QuickBooks will not automatically sync with NeedleNine by design. Only items and accounts created in NeedleNine will sync to QuickBooks.
Import Results
1.Once you have made your selections, click Start Importing button to initiate data transfer. This may take several minutes depending on the number of accounts.
2.When the sync is complete you will see confirmation that mapping was successful. Any errors during the process will be detailed on right side for review.

3. Any items not successfully imported will display as failure. Click the download icon to view CSV file itemizing which items/accounts sync’d successfully and which did not.
Frequently Asked Questions:
Do you support QuickBooks Desktop?
No. QuickBooks Desktop is no longer supported by Intuit so we are unable to integrate with NeedleNine.
I have been using QuickBooks Desktop and would like to switch to QuickBooks Online. How does that work?
Our team has extensive experience switching clients from Desktop to Online. Contact Us to discuss your current status so we can determine the easiest way to migrate your company information. Depending on the level of complexity there may be a flat rate charge to migrate your file.