You can create custom rates in NeedleNine for various instruction types. For example, you may have different rates for Ground Instruction, Flight Instruction, Advanced Instruction, Stage Checks, etc. Furthermore, you can assign specific rates to individual instructors to ensure appropriate billing permissions. Follow these simple steps to create rates applicable to your operation:
- Select Accounting from left nav menu.
- Click + Add New button on top right header.
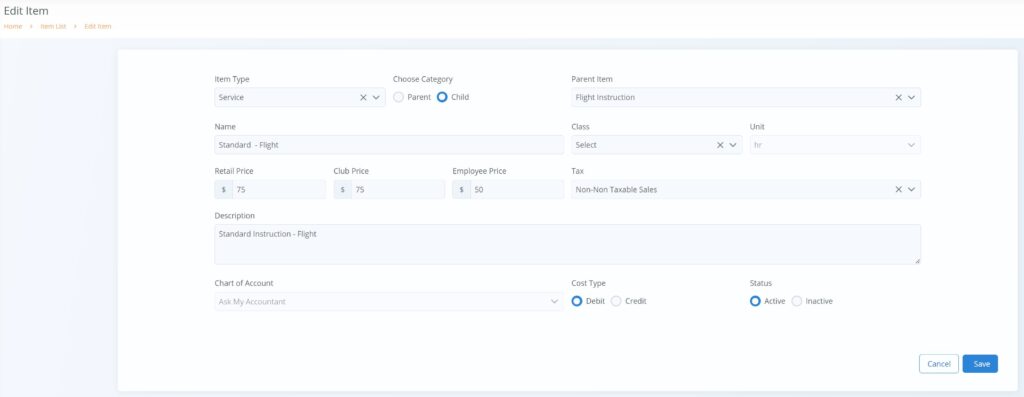
- Select Service for Item Type.
- Choose Child category.
- Select Flight Instruction or Ground Instruction as parent item, as appropriate. This ensures item is selectable in instructor billing permissions.
- Enter Name for instruction rate. This is shown on invoice.
- Select Class (if applicable). See our Class Guide for detailed description on managerial accounting.
- Select Hr for Unit.
- Enter Retail, Club, Employee, and any custom Price Plan rates.
- Retail rates are automatically applied during invoice generation for non-employee NN user roles.
- Club rates are automatically applied during invoice generation if Club feature enables in Settings and user has enrolled in club through profile.
- Employee rates are automatically applied during invoice generation if user is assigned one of the following roles: Chief Instructor, Staff, Instructor, Customer Service, Line Service or Mechanic.
- Custom Price Plan rates are only applied on client’s who have been manually assigned to that Price Plan. Note: if there is no monetary value provided on an account item for the custom Price Plan, NeedleNine will by default charge according to the Retail rate.
- Select appropriate Tax category.
- Enter Description for item. This is shown on invoice.
- Select Chart of Account for item. This ensures proper mapping for QB financial statements.
- Select Debit as Cost Type.
- Choose Active to enable item for selection in Aircraft Details.
- Click Save button to save changes.